Oct 13, 2015
Glückwunsch Bokeh
Today I show you a card that I made for Priscilla (@craftybasteln) who won my Instagram giveaway. I really wanted to try out the Let's Bokeh set from Lawn Fawn. I think it really create a nice effect!

First, I stamped the little racoon from the Happy Party Animal set with Memento Tuxedo Black Ink on Neenah Solar White cardstock as well as the present and colored them with Spectrum Noir markers (raccoon: IG1, IG2, IG4, IG6, IG8, IG10; present: CT1, CT3 + CR10, DR2 + FS2, FS3).
I then chose a nice magenta colored cardstock, cut out a circle on one side and stamped it with the circle stamps and Yeti pigment ink from Lawn Fawn. I used first, second, and third generation stamping.
I stamped the sentiment (Create A Smile) on a vellum circle with VersaMark ink and embossed it with white embossing powder. To give the cut out circle a nice background, I used a piece of watercolor cardstock and distressed it with Tumbled Glass and a blending tool and placed it behind the front panel. To finish off the card, I adhered the raccoon with 3D foam.
Lawn Fawn "Let’s bokeh" - http://goo.gl/YTw6gX
Lawn Fawn "Holiday Party Animal" - http://goo.gl/hCiLN
Create A Smile "Hey Quatschkopf" - http://goo.gl/EVkh4U
Lawn Fawn "Holiday Party Animal" - http://goo.gl/hCiLN
Create A Smile "Hey Quatschkopf" - http://goo.gl/EVkh4U
Lawn Fawn Yeti Pigment Ink (SSS) - http://goo.gl/eWK1fX
Lawn Fawn Yeti Pigment Ink (Scrobby) - http://goo.gl/p690QM
Tsukineko Versamark Ink Pad (SSS) - http://goo.gl/pQUd0w
Tsukineko Versamark Ink Pad (Scrobby) - http://goo.gl/sHjsBK
Tsukineko Memento Ink "Tuxedo Black" (SSS) - http://goo.gl/3KakYL
Tsukineko Memento Ink "Tuxedo Black"(Scrobby) - http://goo.gl/QScX3r
Tim Holtz Distress Mini Ink Pad "Tumbled Glass"
(SSS) - http://goo.gl/8rPDRN
Tim Holtz Distress Mini Ink Pad "Tumbled Glass"
(Scrobby) - http://goo.gl/xcFAsM
Neenah Solar White Card Stock (SSS) - http://goo.gl/kX5flN
Vellum 12x12 (Scrobby) - http://goo.gl/Bj27Ta
Bazzil 40 lb Vellum (SSS) - http://goo.gl/DS9dxB
Tim Holtz Distress Watercolor Cardstock (SSS) - http://goo.gl/6z6fya
Tim Holtz
Distress Watercolor Cardstock (Scrobby) - http://goo.gl/vIlFvZ
WOW! Embossing Powder Opaque Bright White (SSS) - http://goo.gl/s8i6Gc
WOW! Embossing Powder Opaque Bright White (WOW) - http://goo.gl/KqlXOY
Spectrum Noir Markers "Cool Grays" - http://goo.gl/JWAmbI
Spectrum Noir Markers "Yellows" - http://goo.gl/rYUg7l
Spectrum Noir Markers "Reds" - http://goo.gl/dvwLiG
Spectrum Noir Markers "Brights" - http://goo.gl/pP9VFo
Spectrum Noir Markers "Pale Hues" - http://goo.gl/Or1vLE
Scotch Advanced Tape Glider (SSS) - http://goo.gl/HlY8JX
Scotch
Advanced Tape Glider (Scrobby) - http://goo.gl/l9EkXc
3D Foam Squares (SSS) - http://goo.gl/v4K8BJ
Ranger Mini Ink Blending Tool (SSS) - http://goo.gl/EdTAV2
Ranger
Mini Ink Blending Tool (Scrobby) - http://goo.gl/btnZ75
Oct 6, 2015
Watercolor flowers 2 (Create A Smile)
Today I am going to show you the second card I made out of the floral watercolor panel. If you want to now how I created the panel, just click here and you will be redirected to the first card I made. I will also link it up to the November Guest Design Search by Create A Smile. Oh god, I am completely spamming them...
For this second card, I used the center piece and placed it on the top of a white cardbase. I also made two gold strips using the Gold Satin Pearl embossing powder by WOW and placed them at the top and bottom of the floral panel.
This time, I didn't want to include dimension on the floral panel but on the piece that has the sentiment on it. I used white cardstock and stamped the sentiment "herzlichen Glückwunsch" (Congratulations) with Archival Jet Black ink in the center of the panel and adhered it to the cardbase using white fun foam.
Read more
For this second card, I used the center piece and placed it on the top of a white cardbase. I also made two gold strips using the Gold Satin Pearl embossing powder by WOW and placed them at the top and bottom of the floral panel.
This time, I didn't want to include dimension on the floral panel but on the piece that has the sentiment on it. I used white cardstock and stamped the sentiment "herzlichen Glückwunsch" (Congratulations) with Archival Jet Black ink in the center of the panel and adhered it to the cardbase using white fun foam.
Create A Smile "Botanical Love" - http://goo.gl/r0ucP0
Create A Smile "Magic Flowers" - http://goo.gl/a5vIsX
Create A Smile "Glück ist" - http://goo.gl/19gvYt
Tim Holtz Distress Watercolor Cardstock (SSS) - http://goo.gl/6z6fyaCreate A Smile "Glück ist" - http://goo.gl/19gvYt
Tim Holtz Distress Watercolor Cardstock (Scrobby) - http://goo.gl/vIlFvZ
Fun Foam White (SSS) - http://goo.gl/KdQv6l
Tsukineko Versamark Ink Pad (SSS) - http://goo.gl/pQUd0w
Tsukineko Versamark Ink Pad (Scrobby) - http://goo.gl/sHjsBK
Ranger
Archival Jet Black (SSS) - http://goo.gl/EaKnUg
Ranger
Archival Jet Black (Scrobby) - http://goo.gl/AF51UW
WOW! Embossing Powder Gold Satin Pearl (SSS) - http://goo.gl/asIe5Z
WOW! Embossing Powder Gold Satin Pearl (WOW) - http://goo.gl/kVk4SK
Sakura Koi Watercolor Brush Medium (SSS) - http://goo.gl/PuAd5U
Zig Clean Color Real Brush Scarlet Red 23 (SSS) - http://goo.gl/nnx1kU
Zig Clean Color Real Brush Scarlet Red 23 (Scrobby) - http://goo.gl/jjKvra
Zig Clean Color Real Brush Geranium Red 29 (SSS) - http://goo.gl/Wa1En8
Zig Clean Color Real Brush Geranium Red 29 (Scrobby) - http://goo.gl/HjgevP
Zig Clean Color Real Brush Light Blue 36 (SSS) - http://goo.gl/i6ohsF
Zig Clean Color Real Brush Light Blue 36 (Scrobby) - http://goo.gl/hVoejt
Zig Clean Color Real Brush Yellow 50 (SSS) - http://goo.gl/bFTJhv
Zig Clean Color Real Brush Yellow 50 (Scrobby) - http://goo.gl/oPLcXj
Zig Clean Color Real Brush Bright Yellow 52 (SSS) - http://goo.gl/WWVEb2
Zig Clean Color Real Brush Bright Yellow 52 (Scrobby) - http://goo.gl/wUNuOH
Zig Clean Color Real Brush Brown 60 (SSS) - http://goo.gl/b5zvdd
Zig Clean Color Real Brush Brown 60 (Scrobby) - http://goo.gl/hArFQk
Zig Clean Color Real Brush Mustard 67 (SSS) - http://goo.gl/88ddcD
Zig Clean Color Real Brush Mustard 67 (Scrobby) - http://goo.gl/N8XErp
Zig Clean Color Real Brush Orange 70 (SSS) - http://goo.gl/g85k5P
Zig Clean Color Real Brush Orange 70 (Scrobby) - http://goo.gl/kCpzCR
Zig Clean Color Real Brush Purple 82 (SSS) - http://goo.gl/THZspe
Zig Clean
Color Real Brush Purple 82 (Scrobby) - http://goo.gl/xrlFY6
Zig Clean Color Real Brush Deep Violet 84 (SSS) - http://goo.gl/Gy6erb
Zig Clean Color Real Brush Deep Violet 84 (Scrobby) - http://goo.gl/s14urk
Oct 4, 2015
Happy Halloween (Create A Smile)
Today I made another card for the Create A Smile November Guest Designer Call. And I created my first ever Halloween card which was really fun! And as you can see, Mr. Octopus dressed up as spider for Halloween :)
To start off, I found a free SVG file for the spider web at the new SVG store and cut it out of stencil material to use with my Distress inks. I used Chipped Sapphire, Dusty Concord, and Seedless Preserves as well as my blending tool to create a "spooky" background. I sprayed some water on top of it after the blending was done which created a really nice effect.

For the "spider", I stamped the octopus from the stamp set "Underwater Love" by Create A Smile with Memento Tuxedo Black ink as well as the little pumpkin treat bags and the witch hat from the "Holiday Party Animal" set by Lawn Fawn. I thought it would be funny to give him a ton of treat bags since he as so many arms/legs.
I colored my images with Spectrum Noir markers and colored the octopus with IG6, IG8, and IG10. For the treat bags I use OR1, OR2, OR3, and CR11 on the inside. Because I colored over the little tooth of the pumpkin I used a white gel pen to color it white again. To give them a bit of sparkle I've put some Wink of Stella on top of them. For the witch hat I used IG6 and IG8 as well as BP4 and BP7. To make to octopus more spidery, I used my Memento Dual-Tip marker to draw some fur on his head and arms. Using liquid glue, I adhered the treat bags to all arms/legs of the octopus/spider as well as the little hat.
I used the sentiment "Happy Halloween" from another Lawn Fawn stamp set called "Booyah" and embossed it with white embossing powder by WOW on a piece of black cardstock.
To finish off the card, I adhered the spider web panel to a piece of dark gray cardstock which was a bit bigger than the front panel. I also adhered to sentiment strip along with my ATG gun and adhered everything to a cardbase. Lastly, I used 3D foam squares to attach the octopus/spider on top of the spider web.

Create A Smile "Underwater Love" - http://goo.gl/CVQxzm
Lawn Fawn "Booyah" - http://goo.gl/Zcc7mE
Lawn Fawn "Holiday Party Animal" - http://goo.gl/hCiLNn
Simon
Says Stamp Card Stock "Slate Gray" (SSS) - http://goo.gl/SvWu3D
Simon
Says Stamp Card Stock "Black" (SSS) - http://goo.gl/FHGQyQ
Neenah Solar White Card Stock (SSS) - http://goo.gl/kX5flN
Tim Holtz Distress Watercolor Cardstock (SSS) - http://goo.gl/6z6fya
Tim Holtz Distress Watercolor Cardstock (Scrobby) - http://goo.gl/vIlFvZ
Tsukineko Versamark Ink Pad (SSS) - http://goo.gl/pQUd0w
Tsukineko Versamark Ink Pad (Scrobby) - http://goo.gl/sHjsBK
Tsukineko Memento Ink "Tuxedo Black" (SSS) - http://goo.gl/3KakYL
Tsukineko Memento Ink "Tuxedo Black"(Scrobby) - http://goo.gl/QScX3r
Tim Holtz Distress Mini Ink Pad "Chipped Saphire"
(SSS) - http://goo.gl/iKGQ3G
Tim Holtz Distress Mini Ink Pad "Chipped Saphire"
(Scrobby) - http://goo.gl/a2npG2
Tim Holtz Distress Mini Ink Pad "Seedles
Preserves" (SSS) - http://goo.gl/rmKMbv
Tim Holtz Distress Mini Ink Pad "Seedles
Preserves" (Scrobby) - http://goo.gl/iVvmMK
Tim Holtz Distress Mini Ink Pad "Dusty Concord"
(SSS) - http://goo.gl/16Z5oU
Tim Holtz Distress Mini Ink Pad "Dusty Concord"
(Scrobby) - http://goo.gl/nP5IK5
Ranger
Mini Ink Blending Tool (SSS) - http://goo.gl/EdTAV2
Ranger
Mini Ink Blending Tool (Scrobby) - http://goo.gl/btnZ75
Ranger Inkssentials Mini Mister Spray Bottle (SSS) - http://goo.gl/KTJsK7
Ranger Inkssentials Mini Mister Spray Bottle (Scrobby) - http://goo.gl/fl12Vn
WOW! Embossing Powder Opaque Bright White (SSS) - http://goo.gl/s8i6Gc
WOW! Embossing Powder Opaque Bright White (WOW) - http://goo.gl/KqlXOY ZIG Wink of Stella Clear Glitter Brush (SSS) - http://goo.gl/wvDePE
ZIG
Wink of Stella Clear Glitter Brush (Scrobby) - http://goo.gl/VdzqEi
Uni-Ball Pen Signo Gel White (SSS) - http://goo.gl/AUrkmg
Uni-Ball Pen Signo Gel White (Scrobby) - http://goo.gl/8tAqWv
Tsukineko Memento Dual-Tip Marker Tuxedo Black (SSS) - http://goo.gl/iRfccW
Tsukineko Memento Dual-Tip Marker Tuxedo Black (Scrobby) - http://goo.gl/6NZns4
Zig 2-Way Glue Pen Squeeze & Roll (SSS) - http://goo.gl/kDnIEf
Zig 2-Way Glue Pen Squeeze & Roll (Scrobby) - http://goo.gl/OWVsWt
3D Foam Squares (SSS) - http://goo.gl/v4K8BJ
Scotch Advanced Tape Glider (SSS) - http://goo.gl/HlY8JX
Scotch
Advanced Tape Glider (Scrobby) - http://goo.gl/l9EkXc
Spectrum Noir Markers "Yellows" - http://goo.gl/rYUg7l
Spectrum Noir Markers "Brights" - http://goo.gl/pP9VFo
Spectrum Noir Markers "Reds" - http://goo.gl/dvwLiG
Spectrum Noir Markers "Cool Grays" - http://goo.gl/JWAmbI
Bird’s SVG „Spider Webs“ - http://goo.gl/Ri2DWO
Spectrum Noir Markers "Cool Grays" - http://goo.gl/JWAmbI
Bird’s SVG „Spider Webs“ - http://goo.gl/Ri2DWO
Oct 3, 2015
Watercolor flowers (Create A Smile)
It's time for another floral card using the stamp sets by Create A
Smile. I always find myself coming back to these stamp sets - and I
really don't have that with other sets. They are just so nice to color
with different media. And I also created this card for the November Guest Designer Search from Create A Smile. Maybe I get lucky :)
After I'd stamped all flowers I colored them in with the Zig Clean Color Real Brush pens. If you're interested in all the colors I used, you'll find them listed below. I layed down my color and used a brush to either blend out the color or blend two or more colors together.
Red flower: 23, 29, 50, 70, pink flower: 50, 70, 82, sun flower: 50, 52 + 67, 60, orange flower: 70, 50, lilac flower: 84, background: 36
Then, I had to do the most difficult thing for me: I had to cut the colored flowers and I really hoped I wouldn't mess up! And unfortunately, I liked the end result!. I cut ouf a strip from the center and used it in another card that will come to the blog soon.
To give my card a bit of dimension, I used funfoam behind the two strips. Before I glued them to the top and bottom of my cardbase, I stamped the sentiment happy birthday using a set from WPlus9 and Altenew in the center of the card using Archival Jet Black Ink.
Read more
Currently
I am really into colored pencil in contract to a CAS sentiment - so
here you can find another example. I stamped the flowers from two sets
with VersaMark ink onto watercolor cardstock and embossed them with Gold
Satin Pearl embossing powder by WOW. This is such a beautiful and
subtle embossing powder - I just love it - and it goes really well with
these flowers. I also created some masks so I would be able to layer the
flowers behind one another.

After I'd stamped all flowers I colored them in with the Zig Clean Color Real Brush pens. If you're interested in all the colors I used, you'll find them listed below. I layed down my color and used a brush to either blend out the color or blend two or more colors together.
Red flower: 23, 29, 50, 70, pink flower: 50, 70, 82, sun flower: 50, 52 + 67, 60, orange flower: 70, 50, lilac flower: 84, background: 36
Then, I had to do the most difficult thing for me: I had to cut the colored flowers and I really hoped I wouldn't mess up! And unfortunately, I liked the end result!. I cut ouf a strip from the center and used it in another card that will come to the blog soon.
To give my card a bit of dimension, I used funfoam behind the two strips. Before I glued them to the top and bottom of my cardbase, I stamped the sentiment happy birthday using a set from WPlus9 and Altenew in the center of the card using Archival Jet Black Ink.
Create A Smile "Botanical Love" - http://goo.gl/r0ucP0
Create A Smile "Magic Flowers" - http://goo.gl/a5vIsX
Altanew "Halftone Happy" - http://goo.gl/OglGji
WPlus9 "Festive Greetings" - http://goo.gl/4vwKth
Tim Holtz Distress Watercolor Cardstock (SSS) - http://goo.gl/6z6fya
Tim Holtz Distress Watercolor Cardstock (Scrobby) - http://goo.gl/vIlFvZ
Fun Foam White (SSS) - http://goo.gl/KdQv6l
Tsukineko Versamark Ink Pad (SSS) - http://goo.gl/pQUd0w
Tsukineko Versamark Ink Pad (Scrobby) - http://goo.gl/sHjsBK
Ranger
Archival Jet Black (SSS) - http://goo.gl/EaKnUg
Ranger
Archival Jet Black (Scrobby) - http://goo.gl/AF51UW
WOW! Embossing Powder Gold Satin Pearl (SSS) - http://goo.gl/asIe5Z
WOW! Embossing Powder Gold Satin Pearl (WOW) - http://goo.gl/kVk4SK
Sakura Koi Watercolor Brush Medium (SSS) - http://goo.gl/PuAd5U
Zig Clean Color Real Brush Scarlet Red 23 (SSS) - http://goo.gl/nnx1kU
Zig Clean Color Real Brush Scarlet Red 23 (Scrobby) - http://goo.gl/jjKvra
Zig Clean Color Real Brush Geranium Red 29 (SSS) - http://goo.gl/Wa1En8
Zig Clean Color Real Brush Geranium Red 29 (Scrobby) - http://goo.gl/HjgevP
Zig Clean Color Real Brush Light Blue 36 (SSS) - http://goo.gl/i6ohsF
Zig Clean Color Real Brush Light Blue 36 (Scrobby) - http://goo.gl/hVoejt
Zig Clean Color Real Brush Yellow 50 (SSS) - http://goo.gl/bFTJhv
Zig Clean Color Real Brush Yellow 50 (Scrobby) - http://goo.gl/oPLcXj
Zig Clean Color Real Brush Bright Yellow 52 (SSS) - http://goo.gl/WWVEb2
Zig Clean Color Real Brush Bright Yellow 52 (Scrobby) - http://goo.gl/wUNuOH
Zig Clean Color Real Brush Brown 60 (SSS) - http://goo.gl/b5zvdd
Zig Clean Color Real Brush Brown 60 (Scrobby) - http://goo.gl/hArFQk
Zig Clean Color Real Brush Mustard 67 (SSS) - http://goo.gl/88ddcD
Zig Clean Color Real Brush Mustard 67 (Scrobby) - http://goo.gl/N8XErp
Zig Clean Color Real Brush Orange 70 (SSS) - http://goo.gl/g85k5P
Zig Clean Color Real Brush Orange 70 (Scrobby) - http://goo.gl/kCpzCR
Zig Clean Color Real Brush Purple 82 (SSS) - http://goo.gl/THZspe
Zig Clean
Color Real Brush Purple 82 (Scrobby) - http://goo.gl/xrlFY6
Zig Clean Color Real Brush Deep Violet 84 (SSS) - http://goo.gl/Gy6erb
Zig Clean Color Real Brush Deep Violet 84 (Scrobby) - http://goo.gl/s14urk
Oct 1, 2015
Snowglobe Shaker (Lawn Fawn)
The first time I saw the snowglobe set from Lawn Fawn I knew I had to make a ton of shaker cards with it. Today I show you the first one I did using some decorative snow that I bought two years ago and still have a bunch left. And I thought it would be awesome to use it in a winter/Christmas card.
I wanted the card to be pretty simple without a lot of other stuff distracting from the snow shaker. I stamped the snow globe in the center of Neenah solar white cardstock using Memento Tuxedo Black Ink, as well as the little Merry Christmas tag using Ranger Classic Cherry Dye Ink. On a scrap piece of cardstock I also stamped the two little snowmen. I colored them in with my Spectrum Noir markers (IG1, IG2, IG4; scarf and earmuffs: CR10, DR2, scarf and hat: GT2, GT4). For the base of the snow globe I used IG1 and IG2 to keep it simple.
I cut out the inner part of the snow globe and adhered acetate behind it. To create the needed distance for the snow I used a piece of fun foam and cut out the shape of the snow globe, but slightly larger so you aren't able to see the fun foam. I adhered it with strong glue to the cardbase and was now able to fill it with the decorative snow.
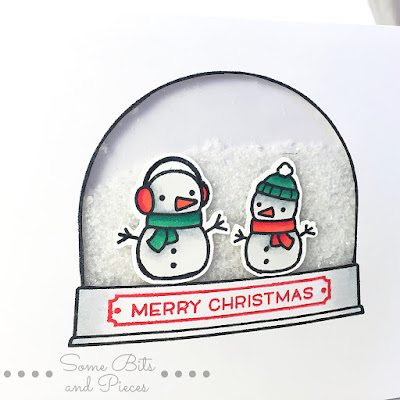
To finish of the card, I adhered the front panel to the background piece and glued the two snowmen on top of the acetate. I didn't want them to be inside of the shaker since I used a lot of snow and you wouldn't have been able to see them otherwise.
Read more
I wanted the card to be pretty simple without a lot of other stuff distracting from the snow shaker. I stamped the snow globe in the center of Neenah solar white cardstock using Memento Tuxedo Black Ink, as well as the little Merry Christmas tag using Ranger Classic Cherry Dye Ink. On a scrap piece of cardstock I also stamped the two little snowmen. I colored them in with my Spectrum Noir markers (IG1, IG2, IG4; scarf and earmuffs: CR10, DR2, scarf and hat: GT2, GT4). For the base of the snow globe I used IG1 and IG2 to keep it simple.
I cut out the inner part of the snow globe and adhered acetate behind it. To create the needed distance for the snow I used a piece of fun foam and cut out the shape of the snow globe, but slightly larger so you aren't able to see the fun foam. I adhered it with strong glue to the cardbase and was now able to fill it with the decorative snow.
To finish of the card, I adhered the front panel to the background piece and glued the two snowmen on top of the acetate. I didn't want them to be inside of the shaker since I used a lot of snow and you wouldn't have been able to see them otherwise.
Lawn Fawn "Ready, Set, Snow" - http://goo.gl/hfy1Bx
Neenah Solar White Card Stock (SSS) - http://goo.gl/kX5flN
Judikins
Embossable Window Plastic Sheets (SSS) - http://goo.gl/c1fSoR
Fun Foam White (SSS) - http://goo.gl/KdQv6l
Tsukineko Memento Ink "Tuxedo Black" (SSS) - http://goo.gl/3KakYL
Tsukineko Memento Ink "Tuxedo Black"(Scrobby) - http://goo.gl/QScX3r
Ranger
Dye Ink Pads „Classic Cherry“ (Scrobby) - http://goo.gl/vhWrWG
Ranger
Dye Ink Pads „Classic Cherry“ (SSS) - http://goo.gl/cRQ9ER
Spectrum Noir Markers "Cool Grays" - http://goo.gl/JWAmbI
Spectrum Noir Markers "Reds" - http://goo.gl/dvwLiG
Spectrum Noir Markers "Brights" - http://goo.gl/pP9VFo
Scotch Advanced Tape Glider (SSS) - http://goo.gl/HlY8JX
Scotch
Advanced Tape Glider (Scrobby) - http://goo.gl/l9EkXc
Decorative Snow (Amazon US) - http://amzn.com/B000XZY0OY
Decorative Snow (Amazon Germany) - http://goo.gl/hg1iBw
Subscribe to:
Posts (Atom)


