
Showing posts with label Video Tutorial. Show all posts
Showing posts with label Video Tutorial. Show all posts
Sep 27, 2015
Star Background (Create A Smile) [VIDEO]
Today is time for another video tutorial. This time I show you how to make a distress background using a stencil. This is a stencil that was included in the goodie bag I received from Create A Smile and it is actually my first stencil (that I didn't do myself with my cutting machine). The quality is awesome and it was fun to use it for the distress background.
If you want to find out how I made this card, you can find a video tutorial below the pictures. All used supplies are also linked below.


Aug 30, 2015
Three little critters [Video Tutorial]
Heute zeige ich euch eine Karte, die ich mit Hilfe von zwei Sets von Create A Smile erstellt habe. Weiter unten könnt ihr ein Videotutorial finden.
Read more
Zunächst habe ich den Fuchs, den Elefanten und den Bären mit Memento Tuxedo Black Ink auf weißen Karton gestempelt und anschließend mit Spectrum Noir Markern koloriert (Fuchs: OR1, OR2, OR3; IG1, IG2, Blender; FS2, FS3; DR2; Elefant: IG2, IG4, IG6; FS2, FS3; DR2; Bär: TN7, TN8, EB5; FS2, FS3). Da mir das Resultat nicht so sehr gefallen hat, habe ich nachträglich Punkte in allen Farben aufgetragen. Am besten kann man diese bei dem Elefanten entdecken und mir gefällt der Effekt, den man mit dieser Technik erhält.
Diese Karte nimmt an den folgenden Challenges teil / This card participates in the following challenges
Simply Create Too - It's A Special Occasion
Anschließend habe ich ein Frontpanel mit drei Kreisen in der oberen Hälfte ausgeschnitten. Die Position der Kreise habe ich auf Aquarellpapier übertragen, da ich als Hintergrund für die Tiere Distress Ink verwenden wollte. Dafür habe ich Dried Marigold benutzt, das ich nach oben hin heller werden ließ. Abschließend habe ich es noch mit meinem Mini Mister bespritzt.
Das Sentiment stammt aus dem Set "Glück ist..." und wurde mit VersaMark und goldenem Embossingpulver von Wow auf das Frontpanel gestempelt. Wieder habe ich die Positonen der Kreise auf den Hintergrund übertragen, damit ich die Tiere korrekt positionieren konnte. Nun musste das Frontpanel nur noch mit Hilfe von Foam Tape auf den Hintergrund geklebt werden. Abschlließend habe ich alles auf einer Kartenbasis befestigt.

Today I'll show you a card featuring two stamp sets from Create A Smile. You can find a video tutorial at the end of the post.


First,
I stamped the fox, the elefant, and the bear with Memento Tuxedo Black
Ink on white cardstock and colored them with Spectrum Noir markers (fox: OR1, OR2, OR3; IG1, IG2, Blender; FS2, FS3; DR2; elefant: IG2, IG4, IG6; FS2, FS3; DR2; bear: TN7, TN8, EB5; FS2, FS3).
Because I didn't like the blending on the critters, I tried a dod
technique. You can't really see them on the fox and the bear but I
really like the effect on the elefant.
Then,
I cut out a front panel with three circles in the upper part. I traced
the position of the circles on watercolor cardstock because I wanted to
use some Distress Ink blending on my background piece. I used Dried
Marigold and tried to fade it out into white. I then spritzed it with my
Mini Mister.
The
sentiment is from the Set "Glück ist..." and means congratulation. I
stamped it with VersaMark and embossed it with gold embossing powder
from WOW. Then, I again traced the position of the cirlces so I know
where to place my critters. Now I only had to adhere the front panel to
the background piece using foam tape and adhere everything to a card
base.


Diese Karte nimmt an den folgenden Challenges teil / This card participates in the following challenges
Simply Create Too - It's A Special Occasion
Aug 23, 2015
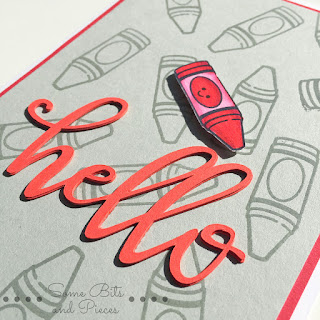
Red Crayon [VIDEO]
Die Karte, die ich euch heute zeige, ist relativ einfach gehalten. Weiter unten im Post gibt es auch ein Video Tutorial dazu. Zunächst habe ich das Set "Color My World" von Lawn Fawn verwendet und den Wachsmalstift mehrere Male mit VersaMark auf hellgrauen Karton gestempelt und anschließend mit klarem Embossingpulver embosst. Ein weiteres Mal habe ich ihn mit Archival Jet Black Ink auf Aquarellpapier gestempelt und ihn anschließend mit Zig Clean Color Real Brush Pens koloriert (20, 24).
Das "hello", das ich auch rotem Karton drei mal ausgeschnitten habe, stammt von Miss Kate Cuttables. Die einzelnen Teile habe ich mit flüssigem Kleber zusammengeklebt, um dem Wort etwas Dimension zu verleihen.
Das graue Panel wurde noch auf ein etwas größeres rotes Panel geklebt, welches anschließend auf einer Kartenbasis aufgebracht wurde. Der Wachsmalstift wurde mit Foam Pads und das Wort mit Flüssigkleber auf dem Frontpanel aufgebracht.

This card is a quick and simple one. You can find a video tutorial below. First, I stamped the crayon from the set "Color My World" from Lawn Fawn several times on light gray cardstock using VersaMark ink and embossed the images with clear embossing powder from WOW. I also stamped the crayon with Archival Jet Black Ink on watercolor cardstock and colored it with the Zig Clean Color Real Brush Pens (20. 24).
The "hello" that I cut three times from red cardstock is by Miss Kate Cuttables. I glued the individual pieces together to create some dimension.
I adhered the gray front panel on a slightly bigger red one and adhered everything to a white card base. The crayon was adhered piece with foam pads and the sentiment was glued to the front piece using liquid glue.

Diese Karte nimmt an folgenden Challenges teil / This card participates in the following challenges
Addicted to CAS - School
Bloggers Challenge - Background
Read more
Das "hello", das ich auch rotem Karton drei mal ausgeschnitten habe, stammt von Miss Kate Cuttables. Die einzelnen Teile habe ich mit flüssigem Kleber zusammengeklebt, um dem Wort etwas Dimension zu verleihen.
Das graue Panel wurde noch auf ein etwas größeres rotes Panel geklebt, welches anschließend auf einer Kartenbasis aufgebracht wurde. Der Wachsmalstift wurde mit Foam Pads und das Wort mit Flüssigkleber auf dem Frontpanel aufgebracht.

This card is a quick and simple one. You can find a video tutorial below. First, I stamped the crayon from the set "Color My World" from Lawn Fawn several times on light gray cardstock using VersaMark ink and embossed the images with clear embossing powder from WOW. I also stamped the crayon with Archival Jet Black Ink on watercolor cardstock and colored it with the Zig Clean Color Real Brush Pens (20. 24).
The "hello" that I cut three times from red cardstock is by Miss Kate Cuttables. I glued the individual pieces together to create some dimension.
I adhered the gray front panel on a slightly bigger red one and adhered everything to a white card base. The crayon was adhered piece with foam pads and the sentiment was glued to the front piece using liquid glue.


Diese Karte nimmt an folgenden Challenges teil / This card participates in the following challenges
Addicted to CAS - School
Bloggers Challenge - Background
Aug 2, 2015
Card Sunday #28 - Wedding Anniversary
Passend zu Wein und Blumen gab es natürlich auch noch eine Glückwunschkarte für meine Eltern zum Hochzeitstag. Für die Karte habe ich die zwei neuen Sets "Tandem Ride" und "Tandem Extras" von Mama Elephant verwendet, ebenso wie "Claire's ABCs" von Lawnfawn, um mir mein Sentiment zu erstellen. Ich werde in dieser Beschreibung nicht so sehr ins Details gehen, da es wieder ein Videotutorial gibt (siehe unten).
Nachdem ich meine Motive mit Archival Jet Black Ink auf Aquarellpapier gestempelt habe, habe ich sei mit Zig Clean Color Real Brush Pens koloriert. Für den Hintergrund habe ich Salty Ocean und Mermaid Lagoon verwendet, wobei ich anfänglich dachte, dass sich die Farben stärker voneinander unterscheiden. Ich habe die Farben nicht sehr stark geblendet, da ich fand, dass man so ein wenig das Gefühl von Wolken vermitteln kann. Anschließend habe ich den Hintergrund noch mit Wasser bespritzt.
Mit meinem Plotter habe ich einen weißen Rahmen ausgeschnitten, wobei der untere Rand etwas größer war als die restlichen Ränder, um dort mein Sentiment platzieren zu können. Dieses habe ich mir mit Claire's ABCs erstellt und zusammen mit einem Stempel von Create A Smile "Glückwunsch zum Hochzeitstag" mit Blue Ribbon Dye Ink gestempelt.
Anschließend habe ich den Hintergrund auf eine Kartenbasis geklebt und den Rahmen mit Foam Tape darüber befestigt. Nun musste ich nur noch meine Motive ebenfalls mit Foam Tape befestigen. Abschließend habe ich noch ein paar meiner selbstgemachten DIY Enamel Dots auf den Hintergrund geklebt.


Besides wine and flowers
my parents also got a card for their wedding anniversary. I used to new
stamp sets by Mama Elephant "Tandem Ride" and "Tandem Extras" as well as
"Claire's ABCs" from Lawn Fawn. I wont go to much into detail because I
also made a video tutorial (see below).
After I stamped my images with Archival Jet Black Ink onto watercolor cardstock, I colored them with Zig Clean Color Reach Brush Pens. For the background, I used Salty Ocean and Mermaid Lagoon, but I thought they would contrast more (but they didn't). I didn't blend the colors too well because I thought the blotchy colors create the feeling of clouds. Then, I stamped the panel with some water.
Using my cutting machine I cut out a white frame with a larger border at the bottom to stamp my sentiment on. I used Claire's ABCs to create the German sentiment "Glückwunsch zum Hochzeitstag" (congratulation to your wedding anniversary) with Blue Ribbon Dye Ink. I used a stamp by Create A Smile that says "Glückwunsch" as part of my sentiment.
Then, I adhered the background to a card base and adhered the frame on top of it using foam tape. I also adhered the images with foam tape to the card. To finish off my card, I glued some of my DIY enamel dots to the background piece.


Diese Karte nimmt an follgenden Challenges teil / This card participates in the following challenges
A Gem of a Challenge - Animals or Birds
Brown Sugar Challenge - Animals
C.R.A.F.T. Challenge - Well done/Congratulations
Digi Choosday - Animals
Read more
Nachdem ich meine Motive mit Archival Jet Black Ink auf Aquarellpapier gestempelt habe, habe ich sei mit Zig Clean Color Real Brush Pens koloriert. Für den Hintergrund habe ich Salty Ocean und Mermaid Lagoon verwendet, wobei ich anfänglich dachte, dass sich die Farben stärker voneinander unterscheiden. Ich habe die Farben nicht sehr stark geblendet, da ich fand, dass man so ein wenig das Gefühl von Wolken vermitteln kann. Anschließend habe ich den Hintergrund noch mit Wasser bespritzt.
Mit meinem Plotter habe ich einen weißen Rahmen ausgeschnitten, wobei der untere Rand etwas größer war als die restlichen Ränder, um dort mein Sentiment platzieren zu können. Dieses habe ich mir mit Claire's ABCs erstellt und zusammen mit einem Stempel von Create A Smile "Glückwunsch zum Hochzeitstag" mit Blue Ribbon Dye Ink gestempelt.
Anschließend habe ich den Hintergrund auf eine Kartenbasis geklebt und den Rahmen mit Foam Tape darüber befestigt. Nun musste ich nur noch meine Motive ebenfalls mit Foam Tape befestigen. Abschließend habe ich noch ein paar meiner selbstgemachten DIY Enamel Dots auf den Hintergrund geklebt.


After I stamped my images with Archival Jet Black Ink onto watercolor cardstock, I colored them with Zig Clean Color Reach Brush Pens. For the background, I used Salty Ocean and Mermaid Lagoon, but I thought they would contrast more (but they didn't). I didn't blend the colors too well because I thought the blotchy colors create the feeling of clouds. Then, I stamped the panel with some water.
Using my cutting machine I cut out a white frame with a larger border at the bottom to stamp my sentiment on. I used Claire's ABCs to create the German sentiment "Glückwunsch zum Hochzeitstag" (congratulation to your wedding anniversary) with Blue Ribbon Dye Ink. I used a stamp by Create A Smile that says "Glückwunsch" as part of my sentiment.
Then, I adhered the background to a card base and adhered the frame on top of it using foam tape. I also adhered the images with foam tape to the card. To finish off my card, I glued some of my DIY enamel dots to the background piece.


Diese Karte nimmt an follgenden Challenges teil / This card participates in the following challenges
A Gem of a Challenge - Animals or Birds
Brown Sugar Challenge - Animals
C.R.A.F.T. Challenge - Well done/Congratulations
Digi Choosday - Animals
Subscribe to:
Posts (Atom)