
Jul 16, 2016
Congrats on your poop machine (Craftin Desert Divas July Release) [Video Tutorial]
Hi everyone, I hope you enjoyed the blog hop for the new July release by Craftin Desert Divas. Today start our Inspiration Showcases on Facebook and I have another baby card for you using the new stamp set "Tiny Treasure". To hop along, just follow this link.

I won't say much about how I made this card here because I made another video tutorial for you. You can find it further down the post.

Read more

I won't say much about how I made this card here because I made another video tutorial for you. You can find it further down the post.


Jul 14, 2016
Craftin Desert Divas July Release [with Video Tutorial]
Welcome to the Craftin Desert Divas July Release Blog Hop. We have some wonderful stamps and dies that we will be sharing with you.
We will first have our 2 day blog hop, starting today and then the next 4 days you can join us on our Facebook fan pages for our release inspiration projects. There is a chance to win a $15. CDD shop credit for the next 6 days when you join us.
We will first have our 2 day blog hop, starting today and then the next 4 days you can join us on our Facebook fan pages for our release inspiration projects. There is a chance to win a $15. CDD shop credit for the next 6 days when you join us.

Plan It Out - 5x7

Scoops - 5x7

Sweat Season - 5x7

Tiny Treasure - 5x7


We also offer SVG stamp outlines for .99 they work perfectly with your cutting machine. You must have a program that opens these files. This is a great alternative to coordinating dies and much less expensive.
Here's what I've created for you...
Hi everyone, for this release I created a bold baby card for you using the new Tiny Treasure stamp set. This set has so many cute details! I won't say much about how I created this card because I made a video tutorial for you that you can find below.


I hope you enjoyed this card and video tutorial. Happy hopping!
Here are the specials for this release:
Save 15% on your entire purchase.
Use Code: July15
Enjoy this special for in stock items only 7/14 thru 7/24 at 10pm MST
All Stamps and Dies are made in the USA.

Each day from 7/14 thru 7/19 one comment left on the projects
will be chosen from random.com to receive a $15.00 CDD shop
credit. So be sure to join us for our 2 day blog hop and then hop
on over to the CDD Facebook page to join us for our Release
Inspiration Hop. The CDD DT will feature more projects
showcasing the new July release.
Your next stop is the super talented:
Jul 9, 2016
A little birdie told me
Hello everyone, I am back with another card for Craftin Desert Divas. Today I want to show you this clean and simple card that I made with the adorable "Little Birdie" stamp set and some additional products.

I started off stamping the bird on white mix media card stock with black water resistible ink and then colored him with watercolor markers. For the background of the card I used the same mix media card stock and die cut it with the largest Crazy Stitched Frame die. Using light blue ink and a blending tool, I applied the ink in a circular motion on the center of the panel.

Using black ink again, I stamped the sentiment "A little birdie told me" from the "Little Birdie" set at the top of the panel. I wanted to extend the sentiment and used the "You are" phrase from the "Tiny Sentiments" set and die cut the word "Awesome" from the "Greeting Word Dies" set from black card stock. To finish off the card I adhered the bird in the center of the card using 3D foam squares.
I hope you enjoyed my card. See you soon.
Here are the products I've used
(click on the picture to get redirected to the product)


Jul 8, 2016
Red, White or Blue (Simply Create Too Challenge Blog)
Hey everyone, it's time for a new challenge at the Simply Create Too Challenge Blog. The theme for this challenge is "Red, White or Blue" and I've decided to go with red and white.

I created a show set of cards with the new fox digi that you can download here. I colored him in with Zig Clean Color Real Brush pens. I also wanted to use two panels for my card, so I die cut the larger one from red card stock and a smaller one from white card stock using dies by Craftin Desert Divas.
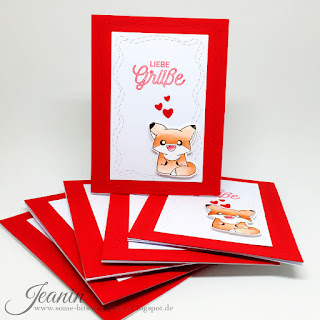
For my sentiment I used the stamp "liebe Grüße" from Create A Smile and stamped it with Memento Lady Bug ink in the top center of the white panel. Using 3D foam squares, I adhered the little fox to the bottom right corner and die cut a few hearts from red card stock and adhered them with glue dots above him.
I hope you enjoyed these cards and I am looking forward to seeing your creations on the blog. Take care!
Read more

I created a show set of cards with the new fox digi that you can download here. I colored him in with Zig Clean Color Real Brush pens. I also wanted to use two panels for my card, so I die cut the larger one from red card stock and a smaller one from white card stock using dies by Craftin Desert Divas.

For my sentiment I used the stamp "liebe Grüße" from Create A Smile and stamped it with Memento Lady Bug ink in the top center of the white panel. Using 3D foam squares, I adhered the little fox to the bottom right corner and die cut a few hearts from red card stock and adhered them with glue dots above him.
I hope you enjoyed these cards and I am looking forward to seeing your creations on the blog. Take care!


Jul 6, 2016
You're amazing
Hi everyone, I quickly wanted to show you this card that I made recently. I actually got inspired by a card I found on the internet but unfortunately I can't remember were or who made the card... However, I thought this card was so pretty, so I had to make my own version. I am trying to get better at using more white space and I think it works really nicely with this one :)

Jul 4, 2016
Coffee (Craftin Desert Divas Linky Party)


Hello friends! The theme for this Linky Party at Craftin Desert Divas is "Coffee"! We would love to see all of your projects that fit this theme! So go ahead and craft it and link it up on the Craftin Desert Diva's Blog.
Every other Monday will mark the beginning of a new semi-weekly Linky Party over
at the CDD blog. We hope you will share your projects with us! And don't forget
about the prizes! Every Linky Party will have a winner and a Top 3!
The more times you link up...the more chances you have to win!!
Our Sponsors for this Linky Party are:


Hi everyone and welcome back to a new Linky Party. For this card I used the Kitchen Cuties stamp set and the cute little cup. The original image included a tea bag that I tried not to ink up and stamp the cup without it with waterproof ink. I then colored it with Zig Clean Color Real Brush pens.
I wanted to create a clean and simple card so I went with a lot of white space on the card. For my sentiment I used the "thanks" die from the Greeting Word dies and die cut it from blue card stock. Using the same card stock, I cut a small strip and adhered it to the bottom of the card. For a little more interest, I also gold embossed some card stock, cut it into a smaller strip and adhered it above the blue strip.

To assemble my card, I stamped the rest of the sentiment "for being there" from the Tiny Sentiments with black in directly above the gold embossed strip. Then I adhered the coffee cup and the thanks die cut to the card. Using glue dots, I also adhered three gold sequins to the card and used a corner chomper to round the top corners.


Subscribe to:
Posts (Atom)