
Showing posts with label Craftin Desert Divas. Show all posts
Showing posts with label Craftin Desert Divas. Show all posts
Jul 14, 2017
Thanks!
Hallo und schön, dass du auf dem Blog vorbeischaust! Das hier ist mein erster Blogpost als Design Team Mitglied von Cards und More! Ich mag Karten, die im Clean und Simple Stil erstellt werden. Aus diesem Grund habe ich für dieses Projekt diesen Stil gewählt.

Den Hintergrund habe ich mit der Schablone "Wavy Stripes" von Dutch Doobadoo und dem Distress Oxide "Salty Ocean" auf weißem Karton erzeugt. Das gestanzte Panel habe ich mit Hilfe von doppeltgenommenem Foamtape auf eine weiße Kartenbasis geklebt.

Für den Schriftzug habe ich zunächst Versamark auf weißen Karton gedrückt und mit glitzerndem, silbernen Embossingpulver embosst. Der Schriftzug "danke" stammt von Lawn Fawn, den ich dann aus dem embossten Karton gestanzt habe.
Vor dem Festkleben des Sentiments habe ich noch ein gestempeltes
Hasenpaar von Mama Elephant, koloriert mit Zigs, in der unteren linken
Ecke befestigt. Zu guter Letzt habe ich eine Schicht Glossy Accents auf das embosste Wort aufgetragen.

Ich hoffe, euch hat diese Karte gefallen und dass ich euch etwas Anregung für euer nächstes Projekt geben konnte.

Produkte, die ihr bei Cards und More kaufen könnt:


Jun 25, 2017
Wishing you a lifetime of happiness
Hi everyone, this is my last post as a design team member for Craftin Desert Divas. I've decided to step down for the upcoming term but I had such a wonderful time at this incredible and talented team!
For my final card I created a rather unusual one for this time of year. But I guess everybody needs some cooling down during these hot summer months. I printed these cute penguins on some mix media card stock and colored them in with Zig markers.

I decided to create a distressed background using different shades of blue. I then die cut the distressed card stock with the medium square of the Inside Scalloped Square dies and keep both the frame as well as the inside piece. Using some foam tape, I adhered the square on a standard white card base and also adhered the penguins in the center.

To finish off the card, I stamped the sentiment "Wishing you a lifetime of happiness" with black ink below the square.

I hope you enjoyed this last card from me. Have a great day!
CDD products used


Jun 10, 2017
Without the rain there would be no rainbow (Craftin Desert Divas)
Hi everyone, I am back with another fun card. I absolutely love the Stormy Weather stamp set by Craftin Desert Divas that was released not so long ago. The images are so adorable and I like the sentiments that come with it.


I hope you like this card! Have a great day!


Read more

So for this card I started off stamping the little mice holding the umbrella on mix media card stock and colored him in with my Zig markers. I also wanted to create a simple but unique background that looked like rain and puddles. So I pressed different blue Distress Inks on a slick surface, spritzed them with water and pressed a piece of watercolor paper into the ink. I did that a couple of times, letting the ink dry in between, until I was satisfied. I used the largest of the Fancy Frame dies to die cut the background panel from the watercolor card stock.
I then die cut the cloud from the Rainbow Die from white card stock and stamped the sentiment "Without the rain there would be no rainbow" on top. To finish off the card I adhered the background panel to a white card base and also placed the mice in the bottom left corner using 3D foam squares. I did the same with the cloud.

I hope you like this card! Have a great day!
CDD products used
May 13, 2017
Sending happiness to you
Hi everyone, I am back sharing a new project with you. I created this fun scene with lots of Craftin Desert Divas products.

I started off creating a light cloud background on white card stock with a DIY cloud stencil and die cut a background panel with the largest fancy frame dies from it. I then also die cut the hills twice from kraft card stock as well as the snowy tops from white card stock.
For the grass I distressed a piece of mix media paper, die cut it with the largest fancy frame die as well as the grassy border die from the Outdoor Landscape 2 dies. So much for the background and die cutting. I adhered everything together, creating a nice scene and glued the complete panel to a dark blue card base.

To give the scene more life, I stamped the little hedgehog and the little bird on mix media paper and colored the images in with Zig markers. I also stamped the little envelope image a couple of times, quickly colored them with copic markers and adhered them to the back/spikes of the hedgehog. I adhered the images to the background using 3D foam squares.
To finish off the card I stamped the sentiment "Sending happiness to you" in the top center of the card with black ink.

I hope you liked this project. I had so much fun making this card! Have a lovely weekend!
CDD products used


Apr 29, 2017
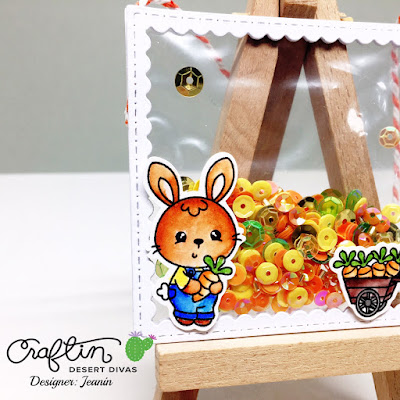
Shake It Up!
Hello everyone, I am back with a special shaker card for you. I love these see-through shaker card and can't get enough of them.
To start off, I die cut two of the medium size inside scalloped squares from Craftin Desert Divas from white card stock and also stamped the cute little bunny holding a carrot and the carrot wagon from the "Somebunny" stamp set on mix media card stock and colored in the images with my Zig markers.

I really hope you enjoyed this shaker card/ornament. Have a lovely day!


Read more
To start off, I die cut two of the medium size inside scalloped squares from Craftin Desert Divas from white card stock and also stamped the cute little bunny holding a carrot and the carrot wagon from the "Somebunny" stamp set on mix media card stock and colored in the images with my Zig markers.

To create the shaker pocket, I used one of my ziplog bags as and my Fuse tool to create a square shaped pocket that was slightly smaller than the die cut pieces. I filled my shaker pocket with Melon Drop sequins and closed it up.
I then used really strong adhesive to nest the shaker pocket in between the square die cuts. I also included a piece of white and orange baker's twine so the card could also used as a tag or ornament. To finish off the project, I adhered the bunny and the wagon to the front of the shaker card.

I really hope you enjoyed this shaker card/ornament. Have a lovely day!
CDD products used
Apr 6, 2017
Make a wish
Hello everyone, I am back with a special card for you. Today I am sharing a simple gift tag with you using the Shaker Tag Dies by Craftin Desert Divas.
I started off die cutting the basic shape of the shaker tag from Kraft card stock and also used the embossing embellishment dies for the top and bottom of the tag to give it more interest.

On mix media card stock, I stamped one of the unicorn from the Magical Unicorns stamp set and colored the image in with Zig markers.
For more embellishment, I also die cut two clouds from the Scene Builders die set from white card stock.

To assemble the tag, I first stamped the sentiment "Make a wish" from the Magical Unicorns stamp set on the top of the tag using black dye ink. Then I adhered the unicorn and one of the clouds to the tag and adhered the second cloud using 3D foam squares to give it a bit more dimension.
I really hope you like this tag and got inspired! After all, Easter is almost here and we all are going to need some gift tags! ;)
CDD products used:


Have fun!

Mar 27, 2017
Treasure Trolls
Hi everyone, I am back with a card featuring the Treasure Trolls stamp set by Craftin Desert Divas.


Read more

I started off stamping the little troll on mixed media card stock and colored her in with Zig Clean Color Real Brush markers. I then went ahead and printed off the digi mine stamp on mixed media card stock and also colored in the background with the same markers.
For the outer frame, I used the largest Inside Scalloped Circle die and die cut it from white card stock to create a contrast to the dark mine background. Using the circle die from the Stitched in Circle die set, I die cut the background and also a standard card base making sure to let the die hang over the folded line to create a circle shaped card base.

Now everything that was left to do was to assemble the card. I adhered the background to the circle shaped card base. Using liquid glue, I then adhered the outer frame on top (it's a bit larger than the card base but not too extreme). To adhere the troll I used 3D foam squares and placed her next to the tracks.
Thank you so much for stopping by! See you soon!
Mar 24, 2017
Coffee Lovers Spring Blog Hop
Hi everyone and thank you for stopping by! I created this card for the Spring Coffee Lovers Bloghop which is starting today and lasts for a whole week!

I used one of the many coffee themed digis by Craftin Desert Divas that are available on their website. How do you like the Unicorn Cup digi stamp?


Here are some of the coffee themed digis that you can purchase from the Craftin Desert Divas Website.

And you can get the Thanks a Latte Bunny for free during the Coffee Lovers Bloghop! Simply use the Code CLBH in the CDD Shop to get it.

Have fun hopping!
Read more

I used one of the many coffee themed digis by Craftin Desert Divas that are available on their website. How do you like the Unicorn Cup digi stamp?


Here are some of the coffee themed digis that you can purchase from the Craftin Desert Divas Website.
And you can get the Thanks a Latte Bunny for free during the Coffee Lovers Bloghop! Simply use the Code CLBH in the CDD Shop to get it.
Have fun hopping!
Mar 9, 2017
See-Trough Shaker Card
Hi everyone, I am back with this fun shaker card. I started off printing the racoons on some mixed media card stock with a laser printer and colored them in with Zig Clean Color Real Brush markers.

Then I made the shaker pocket using some thin plastic sheets and the fuse tool. Before sealing all four sides, I filled the pocket with the Sweet Sixteen sequins and the cute racoons.
Using the largest Fancy Frame die, I die cut the front of a card base so I'd get two nice sides with a scalloped edge. Using strong adhesive, I simply adhered the shaker pocket to the back side of the top and bottom card base piece.

I hope you enjoyed this shaker card and that I could inspire you to make your own.
CDD products used


Subscribe to:
Posts (Atom)