
Showing posts with label Create A Smile. Show all posts
Showing posts with label Create A Smile. Show all posts
Jun 20, 2018
Keep Calm and Love on | Cards und More Blog
Hallo, ihr Lieben! Ich bin nach einer umzugsbedingten Pause endlich wieder zurück! Für diese Karte wollte ich unbedingt einen Hintergrundstempel und Distress Resist verwenden.

Ich habe also zunächst den Stempel mit vieeel VersaMark versehen und dann auf eine Kartenbasis gestempelt. Das Embossingpulver von WOW hat einen wunderbaren Glitzer und sieht klasse in Kombination mit kräftigen Farben aus. Daher habe ich mich für den Hintergrund für das knallige Twisted Citron und, zur Mitte hin, für Squeezed Lemonade entschieden. Die Farbe konnte ich einfach über dem embossten Motiv auftragen und es hat die Farbe nicht angenommen. Man hätte natürlich auch erst den Hintergrund einfärben und dann embossen können. Allerdings bin ich zu ungeduldig, um darauf zu warten, dass die Farbe getrocknet ist ;)

Das gestempelte Bärenmotiv habe ich dann mit den Zig Clean Color Real Brush Markern koloriert und mit 3D Klebepads aufgeklebt. Aber es fehlte noch etwas - daher habe ich noch ein Herz gestempelt, koloriert und dem Bären in die Hand gedrückt. Etwas Wink of Stella und Glossy Accents darauf und schon war ich zufrieden.

Ich hoffe, euch hat meine Karte gefallen und ihr schaut bald wieder mal vorbei! Habt eine schöne restliche Woche!
Verwendete Cards Und More Produkte


Aug 8, 2016
10 years anniversary - 12 Dates Vouchers
Hi everyone, today I am back with a very special post. Today is Alex' and mine 10 years anniversary! Wow! Can you imagine? 10 YEARS? Time flew by so fast and we've experienced so much together!
And this is what we love to do - gain new experiences. We love to try new food, travel (I think Costa Rica was both our favorite so far), try out new sports (like paragliding), go the theater, concerts, comedy events. And that's why I thought "Why not plan some dates for the next year to come?" - 12 in total. I have to admit that this is not my original idea. I actually came across this idea on Pinterest and I thought it was a wonderful idea. So I made 12 date vouchers. I kept them very simple and tried to match stamps that I have with the planned date (which was, unfortunately, not always possible).
I hope you have fun scrolling through the 12 date vouchers. See you later.


Jul 8, 2016
Red, White or Blue (Simply Create Too Challenge Blog)
Hey everyone, it's time for a new challenge at the Simply Create Too Challenge Blog. The theme for this challenge is "Red, White or Blue" and I've decided to go with red and white.

I created a show set of cards with the new fox digi that you can download here. I colored him in with Zig Clean Color Real Brush pens. I also wanted to use two panels for my card, so I die cut the larger one from red card stock and a smaller one from white card stock using dies by Craftin Desert Divas.
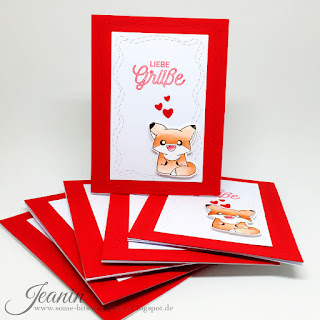
For my sentiment I used the stamp "liebe Grüße" from Create A Smile and stamped it with Memento Lady Bug ink in the top center of the white panel. Using 3D foam squares, I adhered the little fox to the bottom right corner and die cut a few hearts from red card stock and adhered them with glue dots above him.
I hope you enjoyed these cards and I am looking forward to seeing your creations on the blog. Take care!
Read more

I created a show set of cards with the new fox digi that you can download here. I colored him in with Zig Clean Color Real Brush pens. I also wanted to use two panels for my card, so I die cut the larger one from red card stock and a smaller one from white card stock using dies by Craftin Desert Divas.

For my sentiment I used the stamp "liebe Grüße" from Create A Smile and stamped it with Memento Lady Bug ink in the top center of the white panel. Using 3D foam squares, I adhered the little fox to the bottom right corner and die cut a few hearts from red card stock and adhered them with glue dots above him.
I hope you enjoyed these cards and I am looking forward to seeing your creations on the blog. Take care!


Jul 6, 2016
You're amazing
Hi everyone, I quickly wanted to show you this card that I made recently. I actually got inspired by a card I found on the internet but unfortunately I can't remember were or who made the card... However, I thought this card was so pretty, so I had to make my own version. I am trying to get better at using more white space and I think it works really nicely with this one :)

May 13, 2016
Thank you!
Hi everyone, it's time for another challenge on the Simply Create Too Challenge Blog! This time it's all about "Thank you!".
For this challenge I wanted to challenge myself to create a CAS card. I am always struggling with CAS cards, I guess it's too much white space for me :)

I used this beautiful stamp set by Clearly Besotted! It has so many adorable little birds in it which are super easy to color. I colored mine with Zig Clean Color Real Brush markers and a brush.
I also die cut the word "thanks" with the Scripty Thanks die by lawn fawn from black cardstock.

To assemble my cards, I first adhered the die cut thanks to a white squared note card and applied a thick layer of glossy accents over it. After everything was dry, I stamped the second part of the sentiment "for everything" which is from a thank you set by Create A Smile. To finish off the card, I adhered the different birds on top of the thanks facing eachother with 3D foam squares for a little bit of dimension.
I hope you enjoyed my cards and I am looking forward to seeing your creations on the blog!


Feb 25, 2016
Coffee? (DeNami Designs)
This time I want to show you a card featuring thie cute Coffee and Donut stamp by DeNami Designs. I started off stamping the cute image in the center of the card. I also used an alphabet set to stamp the sentiment "COFFEE?!" directly blow the image. Then I colored in the cup of coffee and the donut with alkohol markers and embelished the frosting of the donut with clear drying, shimmery glue.

To include a little bit more color I chose soldid circle stamps in different sizes and stamped them in three different green colors on my white panel. I also used a larger outline circle stamp and stamped it on the coffee and donut image so it looks like a frame.

To finish my card I die cut the white panel with a stitched recangle die and adhered it to a slightly larger green piece of cardstock. Everything was then adhered to a top-folded note card.


Subscribe to:
Posts (Atom)