
Showing posts with label Weihnachten / Christmas. Show all posts
Showing posts with label Weihnachten / Christmas. Show all posts
Dec 9, 2017
Geschenktüten Weihnachten
Hallo, ihr Lieben! Ich bin zurück mit einem neuen Projekt für euch. Und da Weihnachten demnächst vor der Tür steht, habe ich dieses Mal ein paar Geschenktüten gemacht.

Die sind auch schnell gemacht mit Hilfe einer Stanze, die ich jeweils zwei mal aus Glitzerpapier ausgestanzt und anschließend gefalzt und zusammengeklebt habe. Für die Verzierung habe ich allerdings ein eher nicht so weihnachtliches Motiv gewählt: einen kleinen Tiger von My Favorite Things, den ich eine Weihnachtsmütze verpasst habe. So kann man auf schnelle Art und Weise allemöglichen Motive auch zu Weihnachten verwenden.
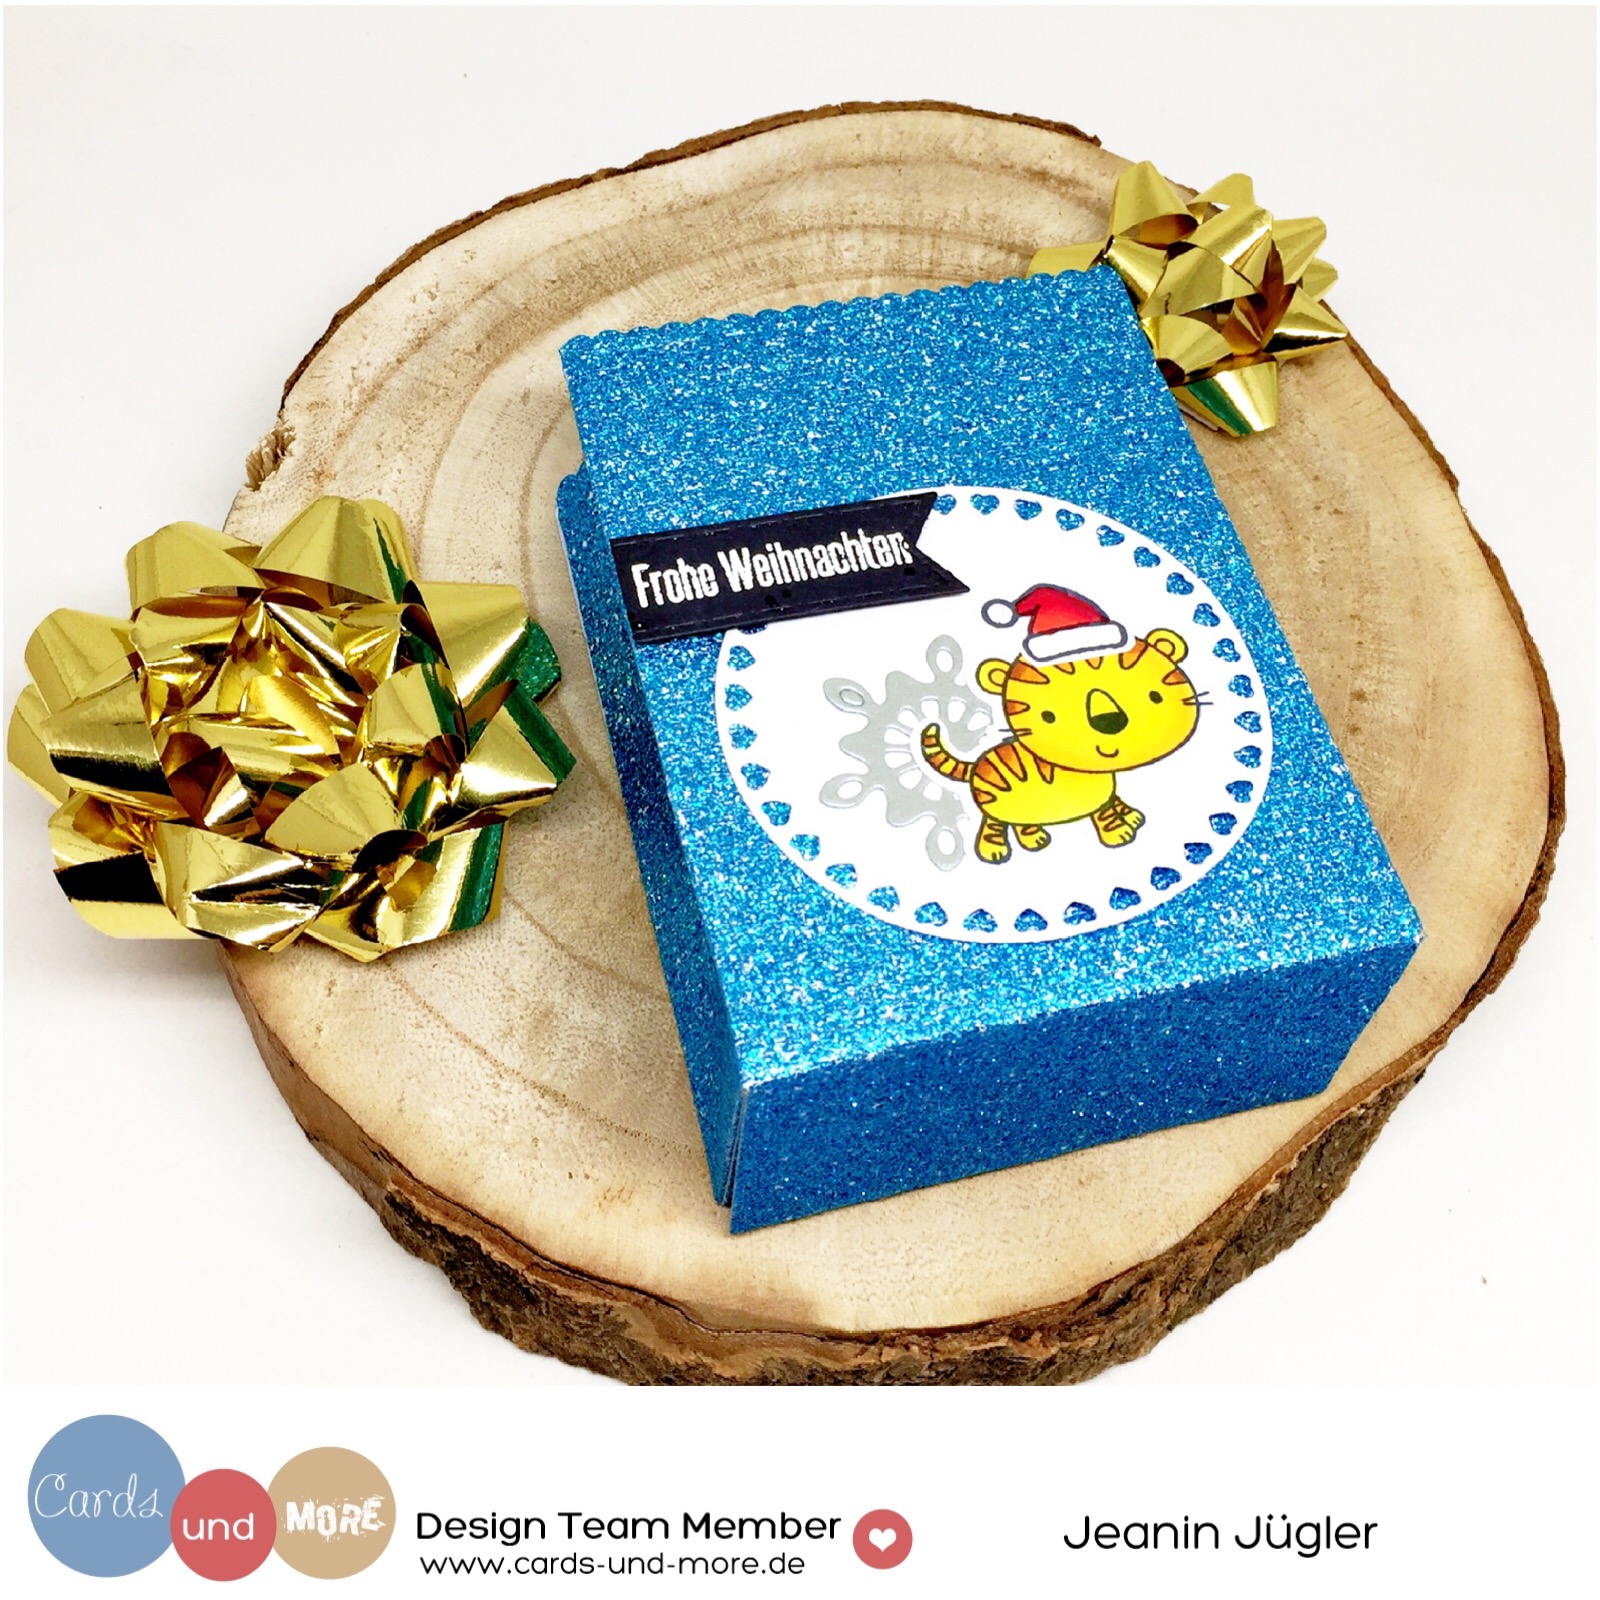
Damit dann doch noch etwas mehr Weihnachtstimmung aufkommt, habe ich aus silbernem Karton eine Schneeflocke ausgestanzt und das Sentiment "Frohe Weihnachten" auf einem Streifen schwarzen Kartons embosst.


Welche Verpackungen macht ihr zu Weihnachten und wie verziert ihr sie?
Habt eine wunderbare Vorweihnachtszeit!

verwendete Cards und More Produkte:


Dec 3, 2017
Advent Calenar | Happy Insta Girls
Hello crafty friends! You know that a group of creative girls (we're calling us the Happy Insta Girls 😄) that met on Instagram organize a blog hop every now and then. This year we decided not to send Christmas cards (we might still do that but not as a blog hop) but a small Advent calendar which includes 6 boxes - one box for each Advent Sunday, one for St. Nichola's Day and one for Christmas Eve.
I was delighted to receive an oh so beautiful calendar from Biggi. Isn't it wonderful with all the adorable little sachets?

I had to send an Advent calendar to Dunja. I made six different boxes and put in various things which she'll find in the next weeks until Christmas. I hope she has as much fun opening the boxes as I had making them!


Have fun hopping along and taking a look at all the amazing calendars made by the girls. Have a wonderful pre-Christmas time!
Read more
I was delighted to receive an oh so beautiful calendar from Biggi. Isn't it wonderful with all the adorable little sachets?

I had to send an Advent calendar to Dunja. I made six different boxes and put in various things which she'll find in the next weeks until Christmas. I hope she has as much fun opening the boxes as I had making them!


 |
| St. Nichola's Day |
 |
| Christmas Day |
Have fun hopping along and taking a look at all the amazing calendars made by the girls. Have a wonderful pre-Christmas time!
Advent calender blog hop list
Jessa - @jessafeig - Useless Trinkets
Claudia - @junipercat - Colorfulcapricorndays
Dani - @stempeldani - Stempelschublade
Birka - @Biiirka - MitherzundSchere
Christine - @c.c.ard - Stampingchicks
Maike - @maikreations - Maikreations
Karolin - @karoscrafting
Reni - @kartenwind - Kartenwind
Katrin - @Katrin-pojekt-cupcake - Projekt Cupcake
Biggi _ @Mimizitrone - Mimizitrone
>> Jeanin - @some_bits_and_pieces - Some bits and pieces <<
Dunja - @dunjatrautmann - Cards and More
Dec 15, 2016
Yeti to Party
Hi everyone, today I wanted to share two projects with you that I made with the recently released stamp set "Yeti to Party" by Craftin Desert Divas. I adore the cute images from the set!


Read more


Tags for Edible Christmas Gifts
Hi everyone, today I have an easy and fun project for you. I made a cookie mix and a mulled wine mix for two friends of mine for Christmas. I used two glass jars for my ingredients so the recipients can immediately see them.
I wanted to include the ingredients and instructions on tags so I went ahead and die cut a tag from white and red card stock using the "Shake It Up" die set as well as the "Stitched In Circles" die set. I also used the add ons for the tag from the first set to create some stitching.


On the red tag I wrote the name of the mix and also the ingredients included in the mix. On the second, white tag I wrote the instructions so the recipient will know how to proceed. For the cookie mix I also included the little cookie from the "Kitchen Cuties" stamp set because it was just perfect for it.


I really love giving self-made gifts and I think my friends will like them. And in addition they will also have a nice jar for storage. I hope I could inspire you to give your own mixes to friends and family and decorate them with goodies from Craftin Desert Divas.
Dec 13, 2016
Warmest Wishes
Hi everyone, today is the first day of the December mini release by Craftin Desert Divas. It will only be two days but will feature some amazing new stamp sets!
Today I am sharing a card that I made with the new "Winter Cheers" set that includes amazing images and sentiments.

You can click here if you're interested in the event!
Dec 6, 2016
Christmas Gift Box
Hi everyone, I quickly wanted to share this Christmas gift box with you that I made fore a friend. I made the gift box with the 3-in-1 punch board by We Are Memory Keepers and decorated it with images from the new Snow Day stamp set and die cut trees from the Shake It Up die set by Craftin Desert Divas.


Read more


Nov 25, 2016
DIY Christmas Ornaments
Hi everyone, I am back with another fun project. I was at a craft fair a couple of weeks ago and found these clear acrylic Christmas ornaments and thought that it would be a fun crafty project to decorate them with moss and stamped images. So I went outside to get some moss and dried it for a couple of days. I chose the adorable Waddle and Jingle digi stamps by Craftin Desert Divas to include in the ornaments.

So I downsized the images so they would easily fit in the ornaments and because I wanted the images to be on both sides, I mirrored them and printed two versions for each ornament. Then I colored them with alcohol markers. Since the images were really small I only did some basic coloring without much shading (apart from the penguin's hat). After fuzzy cutting the images (or rather let them be fuzzy cut by my cutting machine) I adhered the original and mirrored images together.

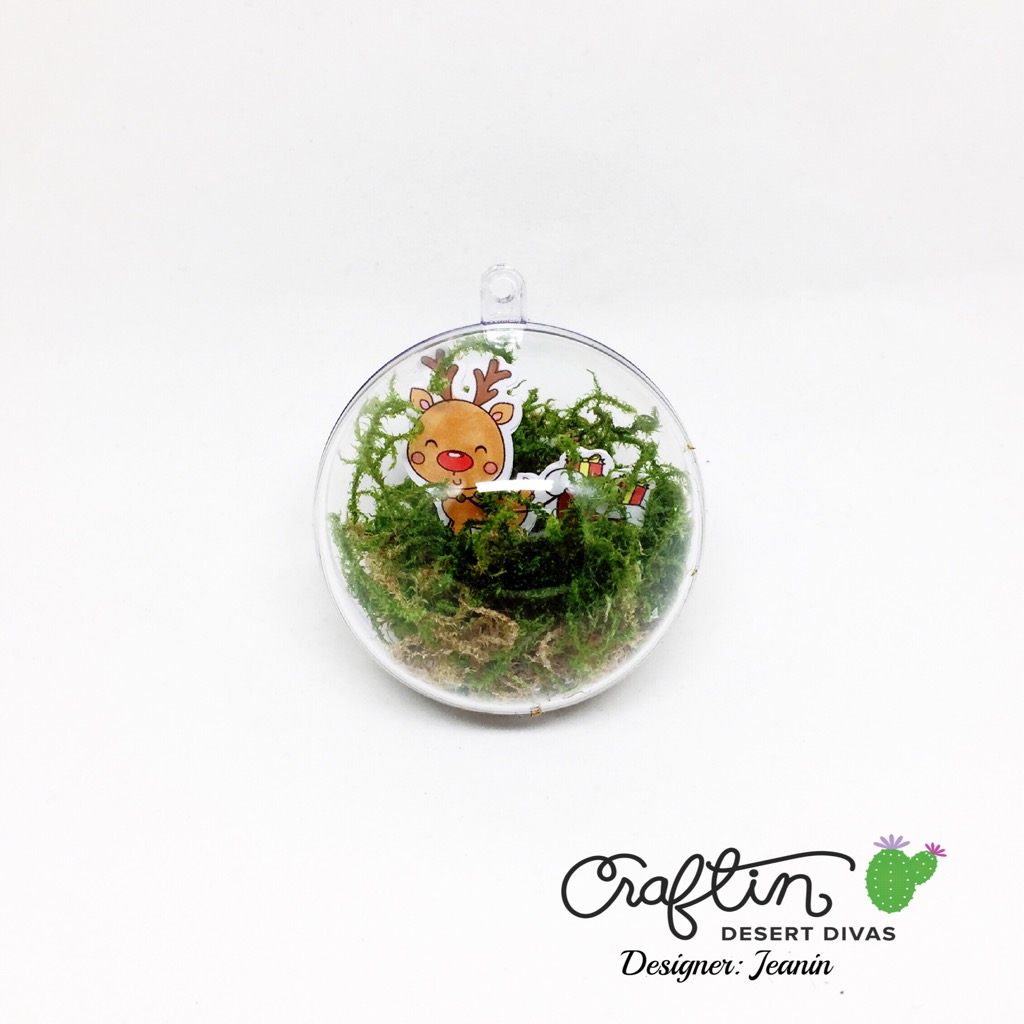
I cut the moss in place and glued each image on top using a hot glue gun. Then I cut easily place the moss and the image in my Christmas ornament.


I really hope you like this idea and give it a try. These would also make perfect Christmas gifts. See you soon!
Dec 20, 2015
Christmas Boxes with the 123 Punch Board
Welcome back, today will be a short post showing you the Christmas boxes that I made for friends and family for Christmas. I used the 123 Punch Board from We R Memory Keepers to make both the boxes and the bows. I really like this tool and the things you can create with it.

I embellished the boxes with German Christmas sentiments embossed in different colors on different colored cardstock and also used images that were left over from other projects.

I adhered the bows with glue dots so they are easy to remove to open the presents. The punch board punches tiny slits in the lids of the box so you can easily open and close them (although I have problem to close them, they seem to pop open now and then).


We R Memory Keepers 123 Punch Board (SSS) - http://goo.gl/xxmPFF
We R Memory Keepers 123 Punch Board (Scrobby) - http://goo.gl/wltPHC
Dec 12, 2015
Christmas Gift Tags
Welcome back! Today I want to show you some Christmas gift tags that I made recently. A couple of weeks ago I came across a Spanish stamp company on Instagram. I immediately had to check them out and their stamps are so adorable. The company is called lavidaenSCRAP and has an Etsy Shop. Go check them out!

I ordered three stamp sets from lavidaenSCRAP and used two to make two different Christmas gift tag variants. For the first variant I used the adorable penguin from "frío de bufanda" and for the second one the reindeer from the set "noe kissitos". I stamped them on white tags that I cut out with my Scan'N'Cut previously. I used Memento Tuxedo Black ink and Memento cottage ivy and lady bug to stamp the sentiments. The sentiments are from a German sentiment set from Dani Peuss.

After I've done all the stamping I went ahead and did some basic coloring on the images. Nothing fancy. I used watercolor pencil from Faber Castell and a waterbrush to blend the pigments together. They are so creamy and blending is so easy with these pencils.

On the back of the tags I stamped the words "to" and "from" so I can write down the name of the person for which the gift is for.

Nov 10, 2015
Christmas Shaker Card
I was browsing Instagram for some fun ideas for shaker cards and I stumbled across this beautiful card and I knew I wanted to re-create it for Christmas. Using the software for my Brother Scan'N'Cut I created an appropriate number of squares, positioned them and added my letters. I've made a German and English version and if you like them you can download them below.
Shaker panels (.fcm, .svg, .pdf): Download

I cut the panels out of white cardstock and adhered a large piece of acetate behind the windows (you don't want to know how many cards I had to throw away because I 1) didn't include acetate and only noticed it after I applied tons of foam tape and 2) applied in on the wrong side...). Then I used a ton of foam tape to put around the whole window frame so nothing can fall out. Because I wanted to have several shaker windows I also put foam horizontally between the windows.

And then it was time to fill the shakers. I had a lot of tiny stars that I bought last year around Christmas and I was happy to have found something to put them to use.

These cards participate in the following challenges
Challenge Up Your Life - Shakercards
Stempelküche - Keine Stempel (no stamps)
Christmas Card Challenges - Anything Goes
The Glory of Christmas Challenge - Glitter and/or Shine
Read more
Shaker panels (.fcm, .svg, .pdf): Download

I cut the panels out of white cardstock and adhered a large piece of acetate behind the windows (you don't want to know how many cards I had to throw away because I 1) didn't include acetate and only noticed it after I applied tons of foam tape and 2) applied in on the wrong side...). Then I used a ton of foam tape to put around the whole window frame so nothing can fall out. Because I wanted to have several shaker windows I also put foam horizontally between the windows.

And then it was time to fill the shakers. I had a lot of tiny stars that I bought last year around Christmas and I was happy to have found something to put them to use.

These cards participate in the following challenges
Challenge Up Your Life - Shakercards
Stempelküche - Keine Stempel (no stamps)
Christmas Card Challenges - Anything Goes
The Glory of Christmas Challenge - Glitter and/or Shine
Sep 29, 2015
Happy Holidays (WPlus9)

As a sentiment, I stamped "Happy holidays" - again with Archival Jet Black ink. I think this ink gives a really nice, crisp impression. Much better than Memento Tuxedo Black Ink.
To finish off the card, I adhered the watercolor panel on red foil cardstock and to a white cardbase.

xxxx
WPlus9 "Festive Greetings" - http://goo.gl/4vwKth
Tim Holtz Distress Watercolor Cardstock (SSS) - http://goo.gl/6z6fya
Tim Holtz
Distress Watercolor Cardstock (Scrobby) - http://goo.gl/vIlFvZ Foil Card Stock (SSS) - http://goo.gl/xfyIIX
Ranger
Archival Jet Black (SSS) - http://goo.gl/EaKnUg
Ranger
Archival Jet Black (Scrobby) - http://goo.gl/AF51UW
Zig Clean Color Real Brush Carmine Red 22 (SSS) - http://goo.gl/YcHqvd
Zig Clean Color Real Brush 22 Carmine Red (Scrobby) - http://goo.gl/BWQnzo
Zig Clean Color Real Brush May Green 47 (SSS) - http://goo.gl/HtYvjj
Zig Clean Color Real Brush May Green 47 (Scrobby) - http://goo.gl/jnRCCR
Zig Clean Color Real Brush Yellow 50 (SSS) - http://goo.gl/bFTJhv
Zig Clean Color Real Brush Yellow 50 (Scrobby) - http://goo.gl/oPLcXj
Zig Clean Color Real Brush Lemon Yellow 51 (SSS) - http://goo.gl/nOlrlh
Zig Clean Color Real Brush Lemon Yellow 51 (Scrobby) - http://goo.gl/AGyxDl
Zig Clean Color Real Brush Orange 70 (SSS) - http://goo.gl/g85k5P
Zig Clean Color Real Brush Orange 70 (Scrobby) - http://goo.gl/kCpzCR
Zig Clean Color Real Brush Violet 80 (SSS) - http://goo.gl/wN6x1N
Zig Clean Color Real Brush Violet 80 (Scrobby) - http://goo.gl/cDT6Hm
Zig Clean Color Real Brush Blue Gray 90 (SSS) - http://goo.gl/NxIz3v
Zig Clean Color Real Brush Blue Gray 90 (Scrobby) - http://goo.gl/rMUYls
Scotch Advanced Tape Glider (SSS) - http://goo.gl/HlY8JX
Scotch
Advanced Tape Glider (Scrobby) - http://goo.gl/l9EkXc
Sakura Koi Watercolor Brush Medium (SSS) - http://goo.gl/PuAd5U
Sakura Koi Watercolor Brush Medium (SSS) - http://goo.gl/PuAd5U
Sep 17, 2015
MFT Christmas Card #1
Today I want to share the first Christmas card that I made this year. Actually feels a bit weird making Christmas cards when it's not yet cold outside. But well, I got in the mood :)
I stamped santa and the little presents on Neenah cardstock with Memento Tuxedo Black ink and colored them in with Spectrum Noir markers (hat/coat: CR10, DR2, DR5; white parts of hat: sparkling snow embossing powder; face: FS2, FS3, FS6; belt: IG6, IG8; CT1; boots/gloves: IG6, IG8; pants: IG4, IG6; paper: IG1, IG2, blender; beard: IG1, IG2, IG4, blender; presents: CR10; DR2, DR5 + GT2, GT3 + CT1, CT3).
Using dark green cardstock, I used snowflakes stamps from Some Odd Girl and Lawn Fawn and stamped them with VersaMark ink and embossed them with white embossing powder. The sentiment "Wunderschöne Weihnachtszeit" means "Wonderful Christmas Season" and was stamped with Classic Cherry Ink on some white cardstock that was cut into a smaller strip with a fish tail.
Using foam tape, the background panel was adhered to the white card front and the sentiment as well as the images where placed on the left side of the panel.

This card participates in the following challenges
MFT Superstar Challenge
One Crazy Stamper - Christmas/Halloween/Fall
CHNC Challenge extra
A Snowflake Promise - Winter or Christmas themed
Christmas Card Challenges - Anything Goes
Subscribe to:
Posts (Atom)